The best way to Grow Brunnera Macrophylla &#3 9; #3 9 & Variegata;

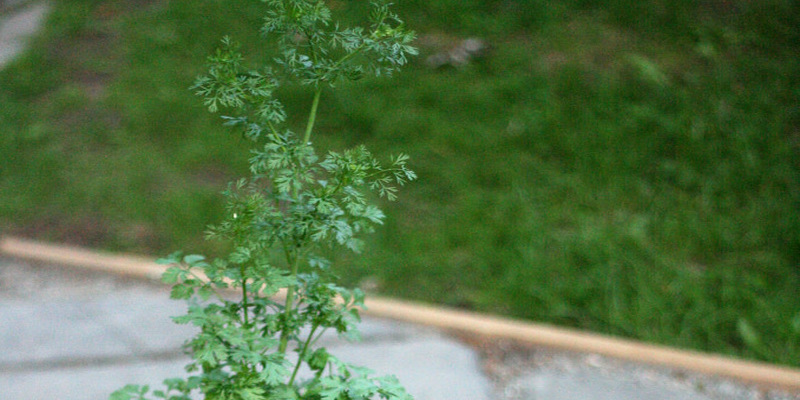
Brunnera macrophylla “Variegata” is generally called variegated heart-leaf brunnera. This flower grows from a rhizome that is fibrous. Mounds of felt-like, pale-green leaves appear each year. Variegata creates heartshaped leaves using a cream-color along the edges. The small blossoms cluster stems. Brunnera macrophylla “Variegata” is planted as reduced borders and floor covers in U.S. Department of Agriculture plant-hardiness zones 4 through 8.

Plant the Brunnera macrophylla “Variegata” in a cool, shaded area. An area with over four hours of sunlight isn’t appropriate for this particular plant. The plant wants the hotter the area to shade. This plant does -shade places like under trees and shrubs.

Mix compost and natural materials to the soil to produce a -rich soil. Good-draining soil is is recommended, but the plant grows nicely along backyard ponds. Plant the flowers using their crowns near-ground level.

Water the plants once a week. Pour the water round the bottom of the crops rather. Wet leaves which do not dry in the shade start the plant to attacks. The brunnera tolerates dry spells, but nevertheless, it’s going to go dormant and cease if subjected to prolonged drought problems, developing.

Cut back the leaves using a knife in the spring. Into a couple inches tall using a lawn-mower, mow the plant again for extremely large places of brunnera. Leaving the leaves through the winter on the crops safeguards the crown of the perennial. Protect the bed if developed in a area with spring-time frosts.

Divide the clumps of crops throughout the spring or fall to propagate the brunnera. Dig the big clumps using a shovel up and split up the person crops. Replant the flowers in the website and transfer other crops to your new location. These self-seed go on to into a new location and therefore carefully discover the little crops using a hand trowel.

See related

The best way to Cultivate Geranium Cuttings

Geraniums (Pelargonium x hortorum) are typical backyard and container crops which can be easily propagated through cuttings. Cuttings are usually used late summer or early fall, but they’re often used early winter or late fall. The cuttings are rooted and looked after throughout the cold temperatures and usually transplanted for their location in the spring. To effectively root a geranium, cultivate or prepare and treatment for the cutting utilizing rooting methods that are several typical to the majority of types of cuttings.

Pinch off the leaves on the bottom halves of a geranium cuttings along with thumb and your finger. Cuttings are usually about 4″ long, obtained from from healthy crops from wholesome stems. Remove the leaves in the bottom one to two inches of the stems in the event the cuttings are longer than this.

Roll where the leaves were eliminated in a powder or fluid hormone, or dip the conclusion of the cuttings. Rooting hormone aids cuttings take root rapidly, ensuring achievement. As indicated by the producer use. To avoid contamination of the container that is entire, place a tiny bit of of rooting hormone on a bit of paper or little cup and roll or use that to dip the cuttings.

Prepare a well-draining potting medium and fill plant pots that are little using the medium until it’s approximately 1/2 inch below the rim. Don’t pack down it. A a mixture of 1 part coarse sand mixed with 1 part peat moss, perlite or vermiculite is useful.

Place the pots in-tray of water that is shallow and enable the medium to moisten in the bottom up. Insert the conclusion of a pencil to the medium to create a hole in every pot for the cuttings. In a pot that is bigger, area the cuttings about three or four inches. This stops the hormone from rubbing the stems off throughout insertion. Insert the cuttings to the holes and tamp the medium across the cuttings. The medium should not be touched by any leaves.

Chopsticks or three pencils, two or other appropriate sticks across the cuttings. They need to be about one to two inches taller in relation to the cuttings. Place a clear-plastic bag loosely overtop of every planting pot. This aids keep humidity and the heat in, an atmosphere for cultivating geranium cuttings. Don’t seal the bags.

Place the pots in a vivid window with lots of in direct mild. Check the cuttings everyday and water as required to keep the medium moist. Should excessive dampness is noticed by you on the bag, go on it off and wipe some of it a way. Too much humidity can result in s Oil circumstances that are wet. After 30 days, gently tug to find out should any resistance is felt by you. In case you do, roots have been effectively shaped by the cuttings.

Wait one to two weeks for the roots to increase a-T least 1-inch. Then you’re able to take off the plastic bags, re-plant the cuttings — which are fully-formed crops, a little — into greater pots with normal planting medium and place them in a sunny region.

See related

The best way to Replace the Black Rubber Protect on a Garbage Disposal

Garbage disposals are handy additions to your kitchen as foods is ground by them when you rinse the plates, bowls and utensils. As useful as disposals are, they are able to give your sink a foul odor when they’re not covered. A garbage disposal’s rubber splash-guard, situated in the sink flange, stops food and water from splashing up when the disposal is in use. Protect, or the guard, might deteriorate as a result of normal wear and tear, and will be replaced.

Turn the power to the rubbish disposal off by flipping off its circuit-breaker in the circuit box whether it’s it is hard-wired or by unplugging it. Confirm the power is off by turning the toggle-switch of the disposal on and off several times.

Open the cupboard doors. Create a stack of telephone publications or wood blocks beneath the disposal after you loosen the fasteners to catch it.

Disconnect a pair or the drain pipe in the side of the disposal by by eliminating one flange bolt. Pull the pipe off yourself.

Locate the threaded fast-link ring close to the very top of the rubbish disposal. Rotate the ring in a counter-clockwise path yourself or by slipping the suggestion of a Phillips screw-driver in a tab; some disposals function steel or plastic fasteners which you need to eliminate before rotating the fast-link ring.

Pry the disposal down in the sink flange if it did not fall when the fast-link ring was loosened. The rubber splash-guard out yourself.

Compare the new and old rings to ensure they’re the same dimensions to avoid leaks. The alternative rubber that is slip splash-guard to the rubbish disposal.

Lift the disposal and rotate the fast-link ring in a clockwise path to secure it. Tighten the the machine by reversing the Phillip’s screwdriver for leverage or by hand.

Reconnect the drainpipe to along side it of the disposal. Run water through the sink to create sure there aren’t any leaks. Turn the power-on.

See related

The best way to Refurbish a Rusty Wood Stove

Heat is provided by wood stoves to an area as well as appeal for a lot of individuals. Buying a wood stove that is new isn’t an alternative for everybody, however there’s a solution. Refurbish an aged wood stove to increase the area. The procedure isn’t difficult, but it’s time consuming and needs plenty of elbow-grease. The least costly method to eliminate the rust is using steel wool and a wire brush. Sandblasted elimination of the rust is time consuming but more costly.

Rub a wire brush on the area that is rusted. Clean the area by blowing off it occasionally with the air nozzle to remove the particles. Continue rubbing the region together with the wire brush before the surface is extremely near to easy or easy. Rub the palm of your hand on the surface to test for bumps.

Rub steel-wool on the stove to produce an area that is sleek. The area that is clean occasionally using the air nozzle to eliminate particles. Rub the palm of your hand on the surface to test for bumps.

Remove the cement from the seams of the wood stove. Chisel and pry all free cement in the seams using a putty knife or chisel. The area that is clean occasionally using the air nozzle to eliminate particles. Check all seams in the woodstove that is specific you’re working on for cement that is aged. Each woodstove is diverse.

Apply stove cement to every seam. Wipe the seam down using a paper-towel then using a moist cloth. Distribute the stove cement in every seam using the straight-edge of the putty knife. Use a damp paper towel to remove extra stove cement in the surface of the woodstove. Cement is hard and very sticky to perform with. Try to fill crevice, crack or each seam as evenly as feasible. Allow the stove cement to dry 2 4 hrs before continuing.

Wipe the complete woodstove down having a paper-towel then a lint-free fabric to eliminate any dirt or particles.

A coat of stove polish within the whole woodstove having a moist lint-free fabric. When implementing the polish use a movement. Easy entry is provided by the movement to applying stove polish in most ridges and style are as. Allow the woodstove polish to dry for 24 hrs. Check the area and look for protection that is sufficient. Apply an additional coat if required.

Buff the stove polish that is dried having a gentle lint-free fabric. When buffing use a round movement.

See related

The best way to Install a Run Roof Vent

Ventilation is very crucial in keeping your your residence. The attic could possibly get very hot with temperatures heading above 100 degrees Fahrenheit, during the summer. This intense heat may damage the asphalt shingles in your roof, which could create leaks and other water-associated injury. A solar-powered roof vent can aid the passive ventilation method of your home’s eliminate heat from your attic, while adding nothing at all to the power expenses of your home.

Mark the area of the lover by driving a nail and standing in the attic. Center the nail between two rafters. The best place for the enthusiast is about one third of the way down in the peak of the roof in the middle of the attic.

Measure the diameter of consumption of the lover. Here is the opening on the edge that enables air to be drawn from the attic by the lover.

Climb around the roof on a ladder and find. The nail should improve the the shingles creating it simple enough to to identify.

Draw a circle on on the top that matches the diameter of the lover, centering it. One way to do this is to reduce a bit of string to coincide with the radius (half the diameter) of the lover consumption and tie one end to the nail as well as another end into a little bit of chalk. Draw the circle using the string, with all the chalk pulled comfortable.

Cut the shingles over the circle using a utility knife. Pry them utilizing a pry-bar.

Drill a hole in the roof over the interior fringe of of the location where the shingles were eliminated by you. Cut a hole in the roof where the shingles were eliminated by you having a reciprocating noticed. Begin reducing the roof by inserting the tip of the saw blade in the hole you drilled. Wear security goggles when when working with the noticed.

Remove the roofing nails from your shingles immediately round the hole in the roof. Lift the shingles up having a pry-bar to loosen the nails, then pull out them using a hammer.

Roofing cement round the hole to the very top of the shingles. Stop leaks and this aids to seal the roof.

Slide the flashing on the most notable edge of the enthusiast beneath the the shingles over the hole. Lower the fringe of of the fanto the roof and press the flashing from the roof. The flashing is the slim steel edge throughout the fan.

Lift the shingles that protect the flashing on the upper-side of the lover up. Screw the leading fringe of of the flashing. Apply a bead of roofing cement in addition to the flashing and press down the shingles contrary to the flashing.

Screw the fringe of of the flashing.

Apply a bead of caulk to the most notable of the joints and also the screws where shingles and the flashing satisfy. Nail the shingles that are loosened .

See related

The best way to Make a Tiny Reading Nook in a Bedroom

Your bedroom ought to be a location at which you are able to relax and have a novel, however a bed isn’t necessarily the most comfy place to study. Making a little reading nook will help renters and prospective buyers begin to see the area as an area that is flexible and encourage an atmosphere of coziness and warmth. Reserve area in the the bed room to generate a reading nook of your very own as you program the arrangement of your new house.

Seats

Every reading nook requires comfy loveseat or a comfy seat. Look as you curl up in your favourite reading spot for seats that can stay comfortable for an extended time period. When developing a reading nook to bring prospective buyers, the more luxurious and more comfy the seat appears, the better. In the event that you are fortunate to have the lowest view of the bay, the bridge, an area park or alternative scene, place the seat therefore it attracts attention to that particular perspective and make an area that is more more inviting.

Shelving

A vital part of a reading nook is the studying materials. A full size book shelf could overwhelm a reading area that is modest, therefore pick a reduced book shelf with three or two ledges to increase the region. Hang a few ledges on the wall above your seat to carry your preferred novels, in case your space is very restricted. Papers and shop magazines on a journal rack connected to the wall or in little baskets positioned together with the bookshelf. Be certain shelving or any substantial furniture is well-anchored to keep it from toppling within an earth quake or beneath the fat of a rock climbing kid.

Lighting

The light to your reading nook ought to be different out of your bedroom light that is normal. Select a lamp providing you with light that the eyes would not have to s-train while studying, but that nevertheless puts a a calming glow off. Specific reading lamps have flexible arms that angle to direct the mild on your publication which means that your eyes remain fit, but your chamber just isn’t so vivid that you are prevented by it from unwinding.

Other Factors

Every reader h AS inclinations that are distinct. Consider what kind of surroundings can help you read. In the event that you have a need for a distraction-free atmosphere, hang a drape from your ceiling to close the studying nook off. In the event that you want music or sounds that will help you concentrate and flake out while studying put in a tabletop fountain. Keep a toss on the rear of the seat for the awesome, overcast days. Contain a little end table at which it’s possible to rest your coffee-cup and plate in the event you normally appreciate a cup of coffee or a bite while reading. Should you not have a perspective, hang images of the bay or neighborhood landmarks to a-DD aesthetic charm.

See related

How to Line Blinds

Ordinary wear in addition to sun and tear place tension on the cords that bind window window treatments. These cords and finally split and fray. You’ve got the option of executing the easy job of line the blinds with twine, or replacing the whole blind, that might be costly. The hardest portion of the job might be to locate replacement twine. In the event that twine can’t be found by you especially for blinds, appear in the views section of a material shop. Those shops usually carry cording which is a weight that is similar.

Expand the blinds fully. Assess the peak of the blinds and multiply that amount by four. Assess the breadth of the blinds and include that to the goods of the initial measurement. As an example, in case your blinds are 3 feet broad and 6 feet long, multi-ply 6 times 4 plus 3. You’ll need 27-feet of cording.

Open the mounts that support the blind in location. Slip the blind from the mount and put it on a dining table or level surface.

Pop the plastic stoppers that are little off the underside bar of the blinds using the end of a screw-driver. Place the stoppers aside.

Find the knots in the opening where the stoppers were removed by you. To the stoppers the knots are tied on some blinds. Cut the knots off using a pair scissors.

Attach to the aged on a single side of the base of the blind. Pull on the twine that is old out and upward of the best header of the blind. The fresh twine weaves its way to the right place on the string ladder that retains the slats set up as you achieve this. Cut the twine off. Repeat this procedure for the threads on the blinds.

Direct the twine to the most notable of the mechanism that retains the blinds in place. Run the underparts of the the header and downandout the thread within the very top of the wheel. Attach by tying a knot in the cord, the knobs to the person pull cords.

Fasten the end-of the twine to the stoppers using a knot that is little. S O the cording can-not come free tuck the ends of the cord ladders in addition to the knot-tied to the stopper within the stopper’s hole. Harness the stopper back into location.

See related

The best way to Troubleshoot Swimming Pool Heaters

Troubleshooting the wellspring of the issue may be more complicated than working with pumps or filters when your swimming pool heater malfunctions. Where the issue is happening inside the heat before it is possible to discover the best way to fix it, you must discover. Of course, this doesn’t necessarily need a call to your tech, but it’s a good idea to consult with your producer’s service manual before starting troubleshooting that you will be knowledgeable about the place of every component and the way that it functions.

Heater Will Not Start or DoesN’t Remain On

Clean the filter and change up the thermostat to attempt the heater. A filter can lead to low stress, and this can create the pressure switch to turn off the heater in the event the pressure making the filter is reduced. Check the shutoff valve on gasoline heaters to make sure the valve is open and so providing fuel. In the event the the system is electrical, make certain that there’s no corrosion in the terminals and electrical connectors are tight. By attaching one volt meter lead into a terminal on the transformer when it doesn’t solve the issue, assess the transformer. Touch another terminal using another lead. An studying of between 20 and 28 volts signifies the transformer is good. If it’s less than that, there might be an issue together with the transformer or the provide. Make the lead from your voltmeter touching the frequent or earth final on the transformer, and assess the circuitry linked to to the heater at the same time. Start by assessing the security fuse, then the pressure and then the high-limit swap swap. These elements are good, in the event the meter shows electric force. If it doesn’t, change them.

Low Circulation or Insufficient Heat

In case your heater shuts off before warming the water to the specified temperature, it might be caused by an improperly established timer or a filthy filter. The heater can be prevented by a filter . Clean the filter and place the temperature change to the ON place in a large setting that is enough the heater turns on. Reset the timer to permit the heater to to operate to get a period that is longer. Assess the systems valves also to be certain that they’re turned to have the the heater. Be sure to are employing the ideal size of heater on your pool when it will not solve the difficulty. You WOn’t heat, when it is little. The pool producer’s merchandise literature will advocate the perfect-size heater on your pool.

Sound

Occasionally your heater will make make strange sounds including grinding, whines or bangs. The initial area to search is the systems hoses and filters. Rubble may create the heater to make whining or tapping sounds during operation. Inspect the machine for blockages and then back-flush the filter. A heater that is noisy also can suggest it is working following the pump shuts off, and this can be related to a defective pressure switch that must be replaced. Switch the heater off should you are unable to get the supply of the sound, and get in touch with a tech.

When to C All a Specialist

A pool heater that is mal-functioning could be a critical security risk. Con-Tact a specialist in case you are uncertain about any scenario or process or phone your manufacturer for help. Don’t make an effort to fix gas or electric problems all on your own. Defective wiring and malfunctioning fuel valves are occupations for professionals. Switch electricity off to the heater when you yourself have discovered the difficulty lies in these places, and phone a tech. Additionally, if you are unable to get your heater to shut down, this could signal a serious issue which should be handled with an expert.

See related

The best way to Put In a Double-Strap Hot Water Heater Restraint

In case of an earth quake, your first concern is the security of your loved ones as well as yourself. That means time to consider securing your hot-water heater is right ahead of the fact. Home inspectors advocate installing a double-strap water-heater restraint. Kits that are accredited can be found at home and hardware shops including the parts that are required.

Mark the studs flanking the waterheater even using the very best third of the hot-water tank as well as the third, without interfering with all the gas or electric connections or the pressure release valve to ensure that when the straps are mounted, the straps will wrap round the tank. Drill pilot holes in the marks, 2 in every stud for the screws that are strap.

Attach to the studs utilizing the screws supplied with the package. Order the straps so they are going to be simple to wrap the heater round before tightening the fasteners securely

Envelop one maintain it in place and strap across the very top of the hot-water tank. Bring up another strap to match with it and align the 2 cinching mounts. With a few kits, it’s important to pull on additional span through among the mounts to take up slack. Thread the bolt which joins hand and the cinching mounts tighten the straps to be held by it in place. Repeat the process for the set of straps.

Scrutinize the straps to ensure they can be routed accurately and do not interfere with connections or the hot water heater piping. Tighten the straps by turning the mount bolts that are cinching using an adjustable wrench. Make an effort to rock the hot-water tank forth and back. Fix the straps as needed.

See related

The best way to Remove

Whether you brew your own at home or purchase commercial teas, these cool drinks will help make so much as the best summer day more bearable. Yet, just like espresso or warm tea, spilled ice tea can make spots that were blotchy on clothing or your furniture. There is a small more time with ice tea that is spilled, according to Good Housekeeping — the material won’t be stained by the chilly beverage as fast as warm tea would. However, it doesn’t ever hurt to act promptly before it places, and treat the spot.

Wear

Apply an ice-cube straight to other things which could go in the washer as well as spots on clothing. The area by patting it using a paper-towel.

Pretreat the spot using laundry pre-treater or a stain remover. Examine the label to find out how long to allow the product of the product sit before you clean them.

Wash them along with your normal laundry detergent. Use bleach if the substance will not be harmed by it or cause the colours to disappear.

Upholstery and Carpets

Pat the blot using a paper-towel before it dries to consume as a lot of the tea as you possibly can.

Stir of dish detergent in to 1 cup of room-temperature water. Wet a paper towel with this particular solution and use it to the spot.

Mix two parts water and one part vinegar to make a vinegar solution. Fill a squirt bottle together with the the answer and spray on the spot. The area by patting it using a paper-towel.

In the event the spot is still observable blot the region again with an increase of dish detergent solution. Fill a squirt bottle with spray and clear water the place to rinse it.

Put paper towels that are several on the place that is wet. Weight them down using a paperweight or another thing that is heavy. Leave them there for many hours or before the place is dry.

Examine the place for stain. In the event the spot is nonetheless visible, use 3% hydrogen peroxide into a paper towel and blot the spot with it. Wait for one hour, then assess for indications of the spot. Repeat before the spot is finished.

See related